Zero to llama.cpp: Run Local LLMs on Windows with AMD GPUs
In a time when RAM and GPU prices are through the roof and every service wants its "just 7 bucks, bro" from you, where can you turn to utilize modern technologies in the form of Large Language Models? That's right, your gaming PC! That is if you're a gamer, of course. And if so, this post is just right for you.

Note
Yes, this is the first post about LLMs on my blog. I tried to hold off as long as possible, but this time the theme is actually close to me -- self-hosting, local-first, open source, and a big fat middle finger to corporations.
Prerequisites #
As stated in the headline, this post will focus on a Windows and AMD setup, so it only makes sense for you to have a Windows PC with an AMD GPU. It's also beneficial if you know how to open the command prompt (Win + R, type cmd), paste a command, and read the output.
Disclaimer
This post focuses on two approaches to local installation: the long and painful one, and the fast and easy one. If you value your time that much and just want to get it done, skip to this part. If you want the full experience, complete with all the gory details, just follow along.
Painful path #
Installation is a rather broad term. Today we will actually build llama.cpp! From source code, no less! On a Windows PC!
LLaMA.cpp's documentation is the best place to start our journey. The whole endeavour will look like this:
- Installing Microsoft Visual Studio (don't confuse it with Visual Studio Code!)
- Installing AMD ROCm
- Installing Git and CMake
- Building llama.cpp
- Et voilà!
Let's go step by step.
0. Installing winget #
What's winget and why do we need it?
Winget, or officially winget-cli, is a command-line utility that handles the same tasks as apt/apt-get, yum/dnf, pacman, and brew. It is a convenient package manager for Windows.
We will need winget for several tasks further down the article, so it's a necessary prerequisite for the successful installation of llama.cpp.
On latest Windows 10 builds and all Windows 11 builds winget is already pre-installed. To verify this execute:
shellPS C:\Users\user> winget --version
If it's not installed, navigate to the Releases page, select your preferred release, follow the installer instructions, and you should have winget installed in no time.
Info
From this point forward, all shell commands will be for Windows PowerShell.
To verify the installation, execute the following command:
shellPS C:\Users\user> winget --version
1. Installing Microsoft Visual Studio #
We need this monstrosity for the C/C++ libraries and the ability to compile them. Go to the Visual Studio website, hit that "Get free download" button, and the installer will be downloaded shortly.
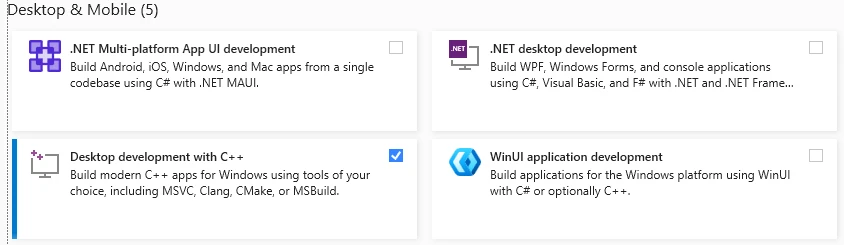
Launch the installer. Make sure to select "Desktop development with C++".
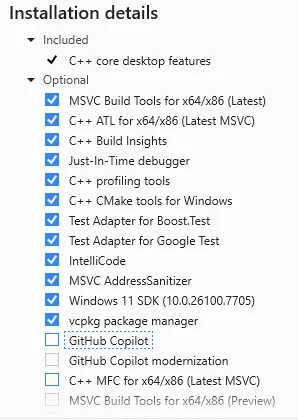
Make absolutely sure to deselect these damn "GitHub Copilot" options, since they are enabled by default.
Hit that "Install" button and wait a couple of minutes for the process to finish.
2. Installing AMD ROCm #
In order to fully utilize our glorious processing unit, we need the proper software. Ever heard of Nvidia's CUDA? ROCm is almost the same thing, but for AMD.
To download the ROCm libraries, head over to AMD's website for the HIP SDK. Why the HIP SDK? Because this SDK allows developers to utilize a subset of ROCm for Windows. The latest version of the HIP SDK (as of this writing) supports ROCm 7.1.1. Download the HIP SDK, follow the installation prompts, and after a few minutes you should have the necessary libraries and software installed.
To verify the installation, execute the following command:
shell& 'C:\Program Files\AMD\ROCm\7.1\bin\hipInfo.exe'
This should display the details of your GPU (or GPUs). If the output looks like a bunch of parameters and numbers, the installation was successful.
3. Installing Git and CMake #
These are pretty easy. Git has its own installer and can be downloaded here. The CMake installer can be found on the official downloads page.
Why do we need them, again?
We need Git to fetch the llama.cpp repository. Alternatively, you can download it as a ZIP archive, extract it, and use it as is. However, that prevents you from updating the codebase by simply pulling the repository, forcing you to manually repeat the process for each new release.
CMake will help us build the source code into executable binaries. There's no way to avoid that, unfortunately.
4. Building llama.cpp #
And now for the most interesting part -- building from source code!
Download the repository first:
shellPS C:\Users\user> git clone https://github.com/ggerganov/llama.cpp
PS C:\Users\user> cd llama.cpp
This should take several seconds, as the repository is rather bulky.
Now, we build. To utilize the GPU for local LLM inference, we must build it with the necessary parameters passed to cmake. If we run the build without any parameters, inference will default to the CPU, reducing token generation speed tenfold[1].
To proceed, we need to install build tools, specifically Ninja.
shellPS C:\Users\hatedabamboo> winget install Ninja-build.Ninja
Ninja is necessary to execute the build files generated by CMake. These files contain compilation instructions that will be processed by clang++, part of the ROCm distribution we installed earlier. And Visual Studio is required to provide the runtime libraries and linker. Oh, what a great blend!
Okay, NOW we build. The command to configure the build environment looks like this:
shellPS C:\Users\user\llama.cpp> mkdir build
PS C:\Users\user\llama.cpp> cmake -S . -B build -G Ninja `
  -DGGML_HIP=ON `
  -DGPU_TARGETS=gfx1100 `
  -DCMAKE_BUILD_TYPE=Release `
  -DCMAKE_PREFIX_PATH="C:\Program Files\AMD\ROCm\7.1" `
  -DCMAKE_C_COMPILER="C:\Program Files\AMD\ROCm\7.1\bin\clang.exe" `
  -DCMAKE_CXX_COMPILER="C:\Program Files\AMD\ROCm\7.1\bin\clang++.exe" `
  "-DCMAKE_CXX_FLAGS=--rocm-device-lib-path=C:/PROGRA~1/AMD/ROCm/7.1/amdgcn/bitcode"
Pretty huge, right? The parameters passed to cmake are important for a correct build:
-DGGML_HIP=ONenables the HIP backend for llama.cpp.-DGPU_TARGETS=gfx1100sets the target GPU for the build. To choose the correct name, refer to AMD ROCm documentation.gfx1100is correct for Radeon RX 7900 XTX, Radeon RX 7900 XT, and Radeon RX 7900 GRE.-DCMAKE_BUILD_TYPE=Releaseoptimizes the build type.-DCMAKE_PREFIX_PATHtellscmakewhere to find HIP files andcmakeconfigs.-DCMAKE_C_COMPILERand-DCMAKE_CXX_COMPILERenableclangusage instead of MSVC.- Finally,
-DCMAKE_CXX_FLAGStellsclangwhere the GPU device libraries are.
If everything goes correctly, you should see the following output:
shell-- Configuring done (8.2s)
-- Generating done (0.9s)
-- Build files have been written to: C:/Users/user/llama.cpp/build
Now we start the actual compilation. Depending on your NUMBER_OF_PROCESSORS environment variable, this may take anywhere from 2-3 to 15-20 minutes.
shellcmake --build build -j $env:NUMBER_OF_PROCESSORS
Finally, after all these preparations, you should see the one thing we've been working toward:
shell[587/587] Linking CXX executable bin\llama-server.exe
This is the executable that launches the server to handle LLMs and provides a built-in Web UI.
If you see no output whatsoever when running the server, try adding the environment variable using the following commands:
shellPS C:\Users\user\llama.cpp> .\build\bin\llama-server.exe # not working
PS C:\Users\user\llama.cpp> .\build\bin\llama-server.exe --version # not working
PS C:\Users\user\llama.cpp> $env:PATH += ";C:\Program Files\AMD\ROCm\7.1\bin"
PS C:\Users\user\llama.cpp> .\build\bin\llama-server.exe --version # working!
HIP Library Path: C:\WINDOWS\SYSTEM32\amdhip64_7.dll
ggml_cuda_init: found 1 ROCm devices (Total VRAM: 24560 MiB):
  Device 0: AMD Radeon RX 7900 XTX, gfx1100 (0x1100), VMM: no, Wave Size: 32, VRAM: 24560 MiB
version: 9037 (bbeb89d76)
built with Clang 21.0.0 for Windows AMD64
To permanently add the ROCm libraries to the PATH environment variable, update the registry:
shellPS C:\Users\user\llama.cpp> [System.Environment]::SetEnvironmentVariable("PATH", $env:PATH + ";C:\Program Files\AMD\ROCm\7.1\bin", [System.EnvironmentVariableTarget]::User)
Painless path #
After finishing all the steps above and successfully building llama.cpp from source and using it for several local tasks, I returned to the official documentation to retrace my steps and see if I had missed anything. Turns out, I missed one critical note in the installation process.
There was a way to install llama.cpp using winget. It took literally one minute to do all the work above.
One. Minute.
shellPS C:\Users\user> winget install llama.cpp
And that's it. llama-server is installed on your computer.
In order to cope with the time lost, I decided to find a single thing that turned out better about building from source than installing via winget.
There wasn't.
Providing llama-server with models #
Now the hardest part is done. What else is necessary to run your own chatbot? The models themselves.
This is a very easy step. Go to the Hugging Face models hub, reduce the Parameters slider to ~32B (since models with more parameters won't fit into RAM), select llama.cpp from the Apps section, and choose whichever you like. For example, unsloth/gemma-4-26B-A4B-it-GGUF. Open the Files and versions tab and select a *.gguf file. Download it and pass it to the llama-server with the -m flag:
shellPS C:\Users\user\llama.cpp> .\build\bin\llama-server.exe -m C:\Users\user\Downloads\gemma-4-26B-A4B-it-UD-Q8_K_XL.gguf --n-gpu-layers 999
This will start the llama-server with the provided model, enable full GPU utilization via the --n-gpu-layers flag, and make the integrated Web UI available at http://127.0.0.1:8080.
Apart from using the built-in Web UI, there are other open-source applications, like Jan. I prefer it to the default one because it supports dynamic switching between models without having to load them one by one into memory or manually unload the previous one. But that's entirely up to you which way to go. Since llama-server exposes an OpenAI-compatible API, it can be plugged into any application supporting an OpenAI backend.
A word about models #
Diving into the wonderful world of open source models is a task and a half.
In the Big Tech world, we have one or several models and their numbers, which increase incrementally:
- gpt-5.4, gpt-5.5, etc.;
- claude-opus-4.6, claude-sonnet-4.7, etc.
The logic behind the naming is simple.
In the ocean of open source models, we have:
- Mistral-Medium-3.5-128B-UD-IQ2_XXS.gguf
- Mistral-Medium-3.5-128B-UD-IQ3_XXS.gguf
- Mistral-Medium-3.5-128B-UD-Q5_K_XL-00001-of-00003.gguf
- Mistral-Medium-3.5-128B-UD-Q6_K_XL-00001-of-00003.gguf
- Mistral-Medium-3.5-128B-BF16-00001-of-00006.gguf
- Qwen3.6-35B-A3B-UD-Q8_K_XL.gguf
What are those???
As open source models are gigantic[2], they must be shrunk in order to even run on your PC. This is where quantization comes into play: the process of making models smaller by dumbing them down, making them less precise, or slowing them down. This reduces model size by several times -- sometimes even by several orders of magnitude.
The most popular quantizations are 16-bit, 8-bit, 6-bit, 5-bit, 4-bit, 3-bit, and 2-bit. The lower the number, the smaller (but dumber) the model.
So every time you see Q or IQ in the name of the model, it means it was quantized from the original.
The number preceding B or T in the name (31B, 128B, 809B) refers to the number of parameters. The more parameters, the smarter the model, and the more demanding it is to run.
Sometimes parameters can be represented as E4B or A2B: these are effective and active parameters, respectively.
Effective parameters represent the actual number of parameters in the model, including embedded ones as well (e.g., 2.3B effective and 5.1B with embeddings). What does that mean? Each layer in a model has its own table of tokens (they are called PLE -- per-level embeddings). Instead of searching for a specific token directly, models walk through a table to find it much faster. This allows the same level of effectiveness while reducing the total number of parameters.
Active parameters enable a Mixture of Experts (MoE) model: depending on the request, only active parameters will be used. For more complex queries that require more thinking, inactive parameters may be brought into the processing. This approach combines execution speed with the theoretical might of a full-scale model.
Serving llama-server on a local network #
Now that you have a full-scale local LLM server with unlimited tokens, you might ask: can you use it (for example) on your smartphone or laptop? And yes, you absolutely can!
The process is very simple:
- Bind
llama-server.exeto0.0.0.0rather than127.0.0.1; - Open your PC to incoming local connections (we don't want to serve our own GPU to every North Korean hacker out there);
- Install an application that can connect to the OpenAI-compatible llama-server API; or
- Open the built-in llama.cpp Web UI in a browser.
To make llama-server accessible to all connections, the launch command will be as follows:
shellPS C:\Users\user> llama-server.exe `
    --host 0.0.0.0 `
    --port 8080 `
    --models-dir "C:\Users\user\llama.cpp\models\"
To allow incoming connections through the Windows firewall, create a new rule using the following command:
PS C:\Users\user> New-NetFirewallRule -DisplayName "llama-server local" -Direction Inbound -Protocol TCP -LocalPort 8080 -RemoteAddress LocalSubnet -Action Allow
This rule is saved permanently and will remain enabled after a reboot.
And finally, to connect to your local llama-server from a different device, either open your PC's IP address in a browser (with the llama-server running), or connect to that same address in your application of choice. You can find your PC's address like this:
shellPS C:\Users\user\llama.cpp> ipconfig.exe | Select-String "IPv4 Address"

   IPv4 Address. . . . . . . . . . . : 10.1.2.3
   IPv4 Address. . . . . . . . . . . : 192.168.1.2
Afterword #
I am somewhat glad to announce that this post was edited and proofread by the locally running Qwen3.6 35B-A3B UD-Q4_K_XL model. I want to emphasize that it was only edited and proofread by an LLM. All of the text was written by my own greasy fingers.
Further Reading #
- A Beginner's Guide to LLM Quantization
- Quantization
- What is mixture-of-experts (MoE), and how does it differ from a dense LLM?
- What's Going on Under the Hood of LLMs
- Friends Don't Let Friends Use Ollama
- LLAMA.cpp and its friendlies to nonrich people