Landing and blog: how-to and why at all
A short story about why I decided to create a personal website and blog and how I set them up and got them running. (Which turned into a manual on how to create a static website with S3 + HTTPS + custom domain name and blog for it using GitHub Pages).
17.06.2024 update
On June 17 I switched blog platform from Jekyll to Material for MkDocs (with which I'm very happy for now). Because of this some parts of this post became obsolete. I'm pretty sure some time in the future I'll update this post with all the new information, or write a separate one regarding reasons behind this transition and transition itself. We'll see.
17.09.2025 update
On September 17 I switched blog platfrom yet another time from Material for MkDocs to 11ty (with which I'm even more happy for now). 11ty allows for more deep customization, optimization and control over the source, so here we are.
Introduction #
Long ago, in a galaxy far, far away, I was a simple datacenter engineer without a big necessity to write notes and store them somewhere. Time passed, my career progressed, and as I became more experienced in systems administration and expanded the array of tools and technologies I worked with, I came to the conclusion that having a notes.txt in my home directory wouldn't be enough. While I still kept a physical notebook on my table, there were times when I'd forget it, leaving me without necessary notes in the middle of a thought process. Not cool.
Somewhere around this time, I discovered a wonderful note organizer called Obsidian[1] through my colleagues. From there, things started moving forward. I began using it not only for professional notes but also for personal ones. It proved to be very handy, especially during the preparation for certifications, whether it was AWS, Hashicorp Terraform, or others (I'm looking at you, CKA). It's like having your own personal Wikipedia.
As the need to write notes grew, I also realized that my notes might be (or might not be) useful to someone else -- people on the internet. Boy, how many blogs I pass through every day! Considering all these factors, I decided to finally create one (and also a landing page, because why not).
Blog: how, why and where #
I don't associate my notes here with the word "blog", but it seems like this is the most convenient term for it.
When I thought about the platform and approach for my blog and landing page, I decided that it should be as simple as possible (KISS[2], as they say). That's why choosing GitHub Pages seemed like the most obvious solution. The platform has built-in functionality to deploy a website using the very popular existing engine. I wouldn't have to worry about deploying pipelines (ha-ha, DevOps engineer wouldn't like to set up another pipeline). The main language for notes is Markdown, and it's already a git repository. Every commit will trigger the pipeline, deploy fresh changes, and display fresh posts in just a minute. GitOps[3] in its full glory! What more could one wish for?
And that's how this blog was created. GitHub has a very nice and thorough manual[4] for the process of creating a personal blog, which is exactly what I followed.
Some customization has been made, primarily with a custom domain name (which I find very good). GitHub has a manual[5] for this case as well. But as I recall correctly, all I did was select the "Custom domain" option in the "Pages" menu of the repository settings and paste my custom domain for this blog. After a few minutes, when GitHub checked DNS availability, I enabled the "Enforce HTTPS" option. You know, a secure web, all that stuff.
And that's it! It sounds easy enough, and it was exactly that way. Until I decided to add some customizations for the Jekyll engine (theme, tags, archive, images). This is where the true nature of Jekyll started to reveal itself.
Jekyll is cool and simple, yes. But its modules (supported by GitHub Pages) are outdated, sometimes even abandoned. This leads to frustrating situations where you have to reinvent the wheel instead of just adding some parameters and modules and doing a git push. Adding tags and a post archive took me about 3 hours and approximately 50 commits to the repository (GitOps, you know). Not to mention that the default theme for Jekyll, minima[6], has been out of development for 4 years already. And to use its latest version (3), you'll have to improvise, because you can't simply set it in the Gemfile, as it's not in the repository. To configure the latest minima theme, I had to include it in a separate setting in _config.yml:
yamlremote_theme: jekyll/minima
So yeah, if you're planning to set up a blog on GitHub Pages, you need to keep that in mind.
O landing! My landing! #
Now, for the fun part -- the landing!
As an AWS user and practitioner, I decided from the start that I wanted to use S3 static website hosting for my landing. Why? I don't like overcomplicating things with unnecessary JavaScript and a web server where it's not necessary. After all, what is a landing page if not a static webpage, right? Besides, with simple HTML and a minimal amount of CSS and assets, my webpage loads in around 300–400 ms. Take that, modern bloatweb!
Note
Initially, I intended to describe what I did during the creation and configuration of my landing page, but in the end, it turned out to be instructions on how to create your own.
So be it.
Domain name #
I began by selecting the appropriate web address for my websites. This was an easy task, considering I have a rather unique nickname. The most challenging part was deciding on the top-level domain name. I contemplated options like .dev, .io, and .boo, but while browsing the Route 53 name registration service, I stumbled upon .me and ultimately chose it.
I purchased the domain through GoDaddy, and… Well, that's where things came to a halt. For a while
Static website hosting #
To successfully serve a website on S3 you have to create an S3 bucket, enable "Static website hosting" setting in the "Properties" menu, choose an index page (index.html by default) and allow public access to it. Here's what the policy would look like:
json{
    "Version": "2012-10-17",
    "Statement": [
        {
            "Sid": "PublicReadGetObject",
            "Effect": "Allow",
            "Principal": "*",
            "Action": "s3:GetObject",
            "Resource": "arn:aws:s3:::<your-bucket-name>/*"
        }
    ]
}
Tip
For future convenience, you should name the bucket the same as your website address.
With these steps, you can already upload index.html to the bucket, and the website will be accessible. The only downside is that the address would look something like http://my-cool-bucket.s3-website-us-west-2.amazonaws.com. Not very representative, amirite? But for this very reason, I purchased a domain, and I'm not afraid to use it!
Configuring custom domain name for static website #
To host your static website on your domain name, you will need to:
- Set up hosted zone on Route 53
- Create a CloudFront distribution
- Configure an HTTPS certificate using AWS Certificate Manager (ACM)
1. Hosted zone on Route 53
Go to the AWS Web Console's Route 53 section, select the "Hosted zones" menu, and click the "Create hosted zone" button. The domain name should match the one you registered with your domain registrar (in my case, GoDaddy), and choose the "Public" type so that everyone can access it.
This will create a hosted zone with several DNS records in it. I don't remember all of them, but I believe they will include A, NS, and SOA records.
Now that we've created the hosted zone, you might wonder how to associate it with your domain. After all, they are managed by different companies, right? That's a great question! To allow AWS to handle DNS requests for your website, you'll need to go to your registrar's domain portfolio, select your domain name, and find the "Nameservers" setting. You'll need to change them to the ones created by the hosted zone in Route 53 – specifically, the NS records. They should look like this:
textns-2048.awsdns-64.com
ns-2049.awsdns-65.net
ns-2050.awsdns-66.org
ns-2051.awsdns-67.co.uk
After taking these actions, all DNS settings and configurations will be under your control and managed through AWS in Route 53.
Alright, with that in place, let's configure our domains!
2. CloudFront distribution
Open CloudFront in the AWS Web Console. Click on the "Create a CloudFront distribution" big yellow button.
For "Origin domain", choose the resource you want to distribute, in our case, it's the S3 bucket. Select it. After this step, a yellow box will appear, suggesting you choose the website endpoint. I skipped this because it disabled the HTTPS option for serving, which I didn't like.
Set "Origin access" to Public, of course.
Other settings I selected were enabling "HTTP/3" and disabling "IPv6".
For "Custom SSL certificate", you can configure it later, which is precisely what we'll do.
This distribution we created will distribute our website. To accomplish this, we need to configure Route 53 to route requests for our domain name (website address) to this distribution.
Go back to Route 53, to your hosted zone, and create a new record. This time it will be an A record. You can leave the subdomain name empty as it is the root of our website. Set "Record type" to A. Click on "Alias" and select "Alias to a CloudFront distribution". Choose the one you created earlier and save it.
Now we need to take a small step back. The World Wide Web typically prefixes www at the start of each website for a reason, so we should comply with this convention and serve these requests as well. It's quite simple, though.
All you have to do is create another S3 bucket, this time with the name of the website preceded by www. Like this: www.your-cool-website.com. All the permission settings are the same as mentioned before, except for the static website hosting configuration, which should be enabled, and "Hosting type" should be set to redirect requests to your main bucket (without ^www.).
Find your CloudFront distribution and edit the settings. Under "Alternate domain name (CNAME)", add the second address (with the ^www.) and save it.
Navigate to Route 53 and your hosted zone. Create a new A record, similar to the previous one, but this time enter www as the subdomain. Set it as an alias for the same CloudFront distribution and save it.
Well done! You've configured your bucket, DNS, and CloudFront distributions. The last thing remaining is to enable TLS for your website.
This is the schema of the whole process:
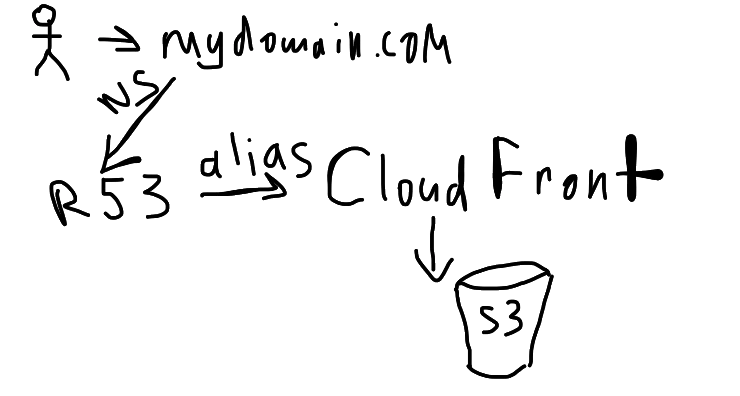
3. HTTP and S
Tip
As every P in the name of something IT-related stands for "Protocol" and
L for "Language", S stands for "Secured".
Locate the Certificate Manager in the AWS Web Console. Here's the tricky part: if your region is different from us-east-1 (N. Virginia), your certificates won't be visible in CloudFront. Change the region to us-east-1 and proceed. Request a new public certificate. The Fully Qualified Domain Name (FQDN) should be your website's name. Enter both of them in the fields. Choose DNS validation, as it will enable you to automatically create CNAME records in Route 53 for your domain and verify their validity.
Now you can go back to CloudFront, edit your distribution, and select your newly acquired "Custom SSL certificate" from the dropdown menu. Save it, and your own personal website with HTTPS and hookers is ready to go!
4. GitOps here, GitOps there
Even a static website may require updates from time to time. Being a DevOps engineer, I wanted to set up a deployment pipeline (and get some practice with GitHub Actions).
In the deployment pipeline, there are three simple steps for the process:
- Commit changes to the repository
- Upload fresh files to S3
However, I was waiting for the changes to appear on the webpage for some time until it dawned on me: CloudFront is a CDN, and it caches the page on edge locations. This leads us to step 1, but actually 3:
- Invalidate updated files
It's as simple as that. The most interesting part looks like this:
yaml- name: Invalidate stale pages
  run: |
    files=$(git diff --name-only HEAD HEAD~1 | grep source | sed 's/source//')
    aws cloudfront create-invalidation \
    --distribution-id $ \
    --paths $files
Here, I check for changes in the actual website pages for the latest commit and invalidate those files using awscli. It's simple yet effective, and I find this part very satisfying.
You can find the complete pipeline in the repository[7] for my website.
5. Costs
All in all, this setup is mostly covered by the AWS Free Tier. The only things that cost money are the yearly domain name price, hosted zone, and taxes. My total cost for a year is expected to be $25: $20 for the domain name and $5 for AWS services (I hope so). Overall, it's quite affordable, I would say.
Configuring blog domain name #
This step is quite straightforward. Create two new CNAME records in your hosted zone with the desired subdomain (one with ^www. and one without) and configure them to redirect requests to your GitHub Pages domain (somethingsomething.github.io), which you will enter in the "Value" field. This new subdomain should then be entered in the "Custom domain" field in the "Pages" menu of your repository settings.
Epilogue #
The source code for both my ladning and my blog can be found at my GitHub:
Closing remarks
As always, feel free to disagree with me, correct my mistakes and befriend me on one of the social media platforms listed below.
During the process of writing this post, the following music compositions have been listened to:
Protectorate - UnderRail Extended Soundtrack, All Blasphemous Boss Themes, Dark Souls 3 All Boss Theme Songs OST (+DLC), Bloodborne All Boss Theme Songs OST (+DLC).